
This blog post has secrets. Shhhhhhh.
If you make it to Sedona, Arizona, you will definitely hear about, and likely visit, Cathedral Rock. It is probably one of the most photographed and most frequently hiked spots in Sedona. I have only visited in May, October and November and it’s never been too crowded – really just enough people to stop and complain with about being out of shape. Secret #1: Go in spring or fall to avoid crowds.

When I’ve visited in October and November the weather was stunning with blue skies and views of the red clay, green pines and bright yellow cottonwood trees. The picture above was taken in late May and it snowed. Maybe don’t go in May either.

The Cathedral Rock hike is less than two miles and has less than 800 feet of elevation, but there are some parts where you’ll need to do some scrambling with your hands so give yourself a couple of hours. This goes without saying for any hike, ever, but don’t forget to take a backpack with some water. You’ll need it, even if it snows.

You’ll want to take a look around at the beautiful views, but that’s tough to do when you’re watching your step, so account for that time too. About halfway up there’s a great spot to take pictures and catch your breath. Some more advice, don’t carry a giant purse. Believe it or not, the bag I’m carrying is usually really practical for hiking, but in the spots where I had to scramble up and down Cathedral Rock it was dragging across the ground. A backpack is a far better decision.

Another thing to remember is that there won’t be any bathrooms. There are toilets at the bottom of the rock, so go before you leave, kids! Let’s just say that if you’re an experienced hiker you know that you need to carry everything out with you, including your waste. Secret #2: If you don’t think you can make it, pack a poop bag! Also, I’m not sure what’s happening with my neck in this picture. I think all the blood had gone to my chest to keep my lungs working.

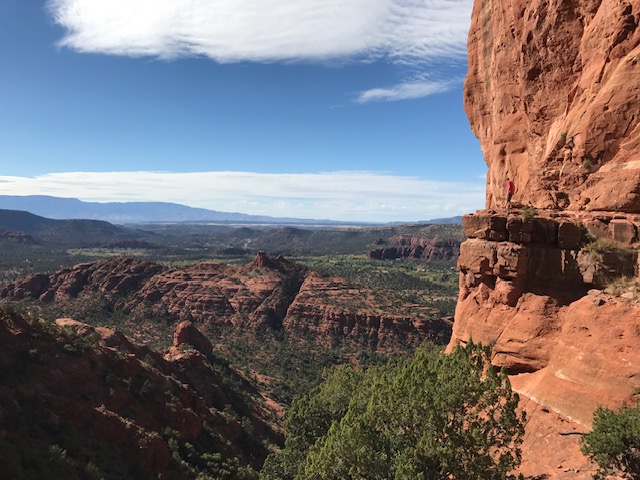
Now for the big secret! Once you get to the top, most people turn right. If you look closely you can see my husband walking out on the ledge. I will say, it’s not quite as perilous as it looks and the views are worth the shaky knees. Every time we’ve done this hike I’ve seen person after person taking photos on that ledge. I would imagine that it gets pretty crowded out there in the summer. So, secret #3 is: Turn left.

It will look like you’re not supposed to go that way but go anyway. When you can turn left again, do. This is one of the places where you’ll have to do some scrambling. If you’re able, climb up the incline to this spot where the rocks turn to vertical spires. It is purported to be a vortex site that produces uplifting energy. Whether the vortex is real or not, I can say the energy is pretty amazing.

Going down is much faster, but in the places where you scrambled on the way up, you’ll do some boot-scooting on the way down. Be careful! One of us ended up with a hole in our pants right in the spot where you don’t want a hole in your pants.
All in all, this is one of my favorite hikes. It’s fun, a little challenging and the views are simply amazing!